A complete guide to integrating your Instagram feed into WordPress


Integrating an Instagram feed into WordPress can be an effective way to showcase your latest content, engage your audience, and increase your social media following.
In this comprehensive guide, we will walk you through the step-by-step process of seamlessly integrating an Instagram feed into your WordPress website. From creating an Instagram developer account to selecting and installing the most suitable Instagram feed plugin for WordPress, we’ve got you covered.
Why add an Instagram feed to your WordPress site?
Before we dive into the integration process, let’s briefly explore why you should consider incorporating this engagement-boosting tool:
- Showcasing fresh content. By integrating a feed, you can automatically display your latest Instagram posts on your WordPress website, ensuring that your site always has engaging content and a fresh user experience.
- Increasing engagement. A visually appealing feed can captivate your audience and encourage them to interact with your content, leading to increased engagement on your website.
- Building social proof. Displaying your Instagram content on your WordPress site can help build social proof by showcasing user-generated content, customer reviews, and testimonials.
Now that we understand the benefits, let’s move on to the step-by-step process of integrating an Instagram feed into WordPress.
Select and install an Instagram feed plugin
To seamlessly integrate, you will need to choose a suitable Instagram feed plugin. There are several plugins available, but in this guide, we will focus on two popular options: SmashBalloon and SociableKIT.
SmashBalloon
SmashBalloon is a powerful and user-friendly Instagram feed plugin for WordPress that’s also highly secure. Follow these steps to install and configure SmashBalloon:
- Login to your WordPress dashboard and navigate to Plugins > Add New.
- Search for the SmashBalloon plugin and click on the Install Now button next to the SmashBalloon Instagram Feed plugin.
- Once the plugin is installed, click on the Activate button to activate the plugin.
- In your WordPress dashboard, navigate to Instagram Feed > Settings to configure the plugin.
- In the settings page, enter your SmashBalloon license key and click the Activate button to activate the plugin.
- Next, click on the Configure button to connect your Instagram account to the plugin.
- Follow the on-screen instructions to authorize the plugin to access your Instagram account.
- Once your Instagram account is connected, you can customize your Instagram feed layout, design, and interaction options according to your preferences.
SociableKIT
SociableKIT is another popular Instagram feed plugin for WordPress that fully integrates with the Brizy website builder. Follow these steps to install and configure SociableKIT:
- Login to your WordPress dashboard and navigate to Plugins > Add New.
- Search for the SociableKIT plugin and click on the Install Now button next to the SociableKIT plugin.
- Once the plugin is installed, click on the Activate button to activate the plugin.
- In your WordPress dashboard, navigate to SociableKIT > Settings to configure the plugin.
- Enter your SociableKIT API key in the settings page and click the Save Changes button to activate the plugin.
- Next, click on the Create button to create a new Instagram feed.
- Follow the on-screen instructions to connect your Instagram account and customize your feed according to your preferences.
Customize your Instagram feed
Once you have installed and configured your chosen Instagram feed plugin, it’s time to customize your content to match your website’s design and style. Both SmashBalloon and SociableKIT offer a range of customization options, including feed layout, design, and interaction settings.
SmashBalloon customization
To customize your Instagram feed using SmashBalloon, follow these steps:
- In your WordPress dashboard, navigate to Instagram Feed > Settings.
- Click on the Customize button next to your feed.
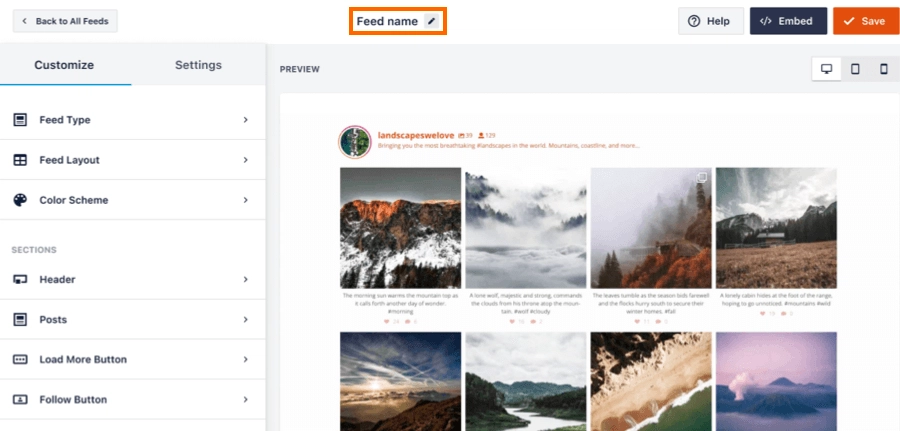
- In the customization editor, you can adjust various settings, including feed layout, color scheme, header design, post style, and more.
- Preview your changes in real-time and click the Save button to apply your customization.
SociableKIT customization
To customize your Instagram feed using SociableKIT, follow these steps:
- In your WordPress dashboard, navigate to SociableKIT > Settings.
- Click on the Create button next to the Instagram account you want to customize.
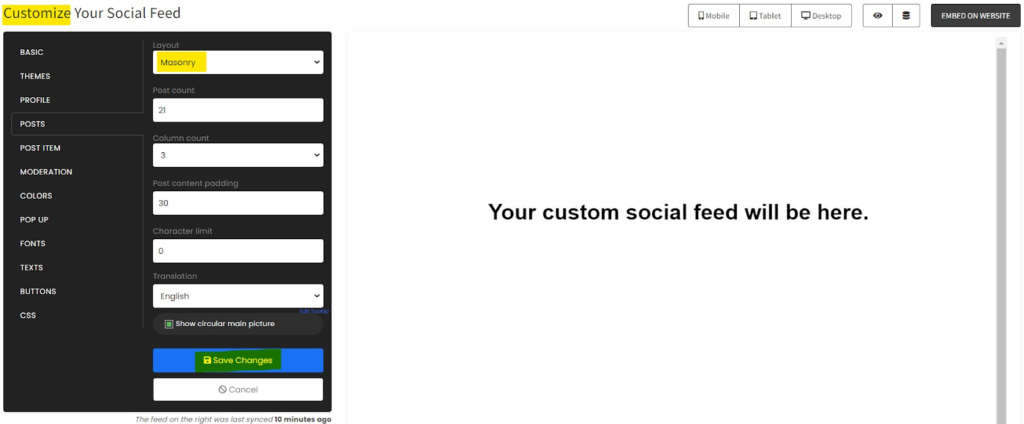
- In the customization editor, you can modify settings such as feed layout, image resolution, caption display, and more.
- Preview your changes in real-time and click the Save button to apply your customization.
Remember to experiment with different customization options to find the perfect look for your post feed.
Embed your Instagram Feed in WordPress
Once you have customized your Instagram feed, it’s time to embed it into your WordPress website. Both SmashBalloon and SociableKIT offer multiple embedding options.
SmashBalloon embedding
To embed your Instagram content using SmashBalloon, follow these steps:
- In your WordPress dashboard, navigate to the page or post where you want to embed your Instagram feed.
- Add a new block and search for the “SmashBalloon Instagram Feed” block.
- Select the block and choose the Instagram post feed you want to display from the block settings.
- Preview your page or post to see your embedded feed in action.
SociableKIT embedding
To embed your Instagram feed using SociableKIT, follow these steps:
- In your WordPress dashboard, navigate to the page or post where you want to embed your content.
- Add a new block and search for the “SociableKIT Instagram Feed” block.
- Select the block and choose the feed you want to display from the block settings.
- Preview your page or post to see your embedded Instagram feed in action.
Congratulations! You have successfully integrated an Instagram feed into your WordPress website.

Best practices and troubleshooting
To ensure a smooth integration and optimal performance of your Instagram feed, consider the following best practices and troubleshooting tips:
- Regularly update your Instagram feed plugin. Keep your Instagram feed plugin updated to access new features and bug fixes.
- Optimize your images. Resize and compress your Instagram images to ensure fast loading times and optimal performance.
- Check Instagram API limitations. Instagram imposes certain limitations on API usage, such as rate limits and access restrictions. Make sure to stay within these limitations to avoid disruptions.
- Test your feed on different devices. Check how your Instagram feed appears on different devices, such as desktops, tablets, and mobile devices, to ensure a consistent and responsive user experience.
- Troubleshoot common issues. If you encounter any issues with your Instagram feed, consult the plugin documentation or support resources for troubleshooting guidance.
Remember to regularly monitor and update your Instagram feed to keep it fresh and engaging for your website visitors.
Keep your users engaged with Instagram
Integrating an Instagram feed into your WordPress website can significantly enhance your site’s visual appeal, engagement, and social media following. By following the step-by-step process outlined in this guide and customizing your feed to match your website’s design, you can seamlessly integrate dynamic Instagram content into your WordPress site. Remember to adhere to best practices and troubleshoot any issues that may arise to ensure a smooth integration and optimal performance.
Now, it’s time to get started and showcase your Instagram content on your WordPress website. For more tips on integrating your WordPress site with social media, check out our guide to the best social media plugins.
More articles from us!
